How to Burn Wood With a Battery Charger? | Converting It Into a Makeshift Woodburning Device
For fractal wood burning with a battery charger, you will need to convert it into a makeshift woodburning device at first. To amplify the voltage to a desirable range, connect a dimmer switch with the input wire of the battery charger.
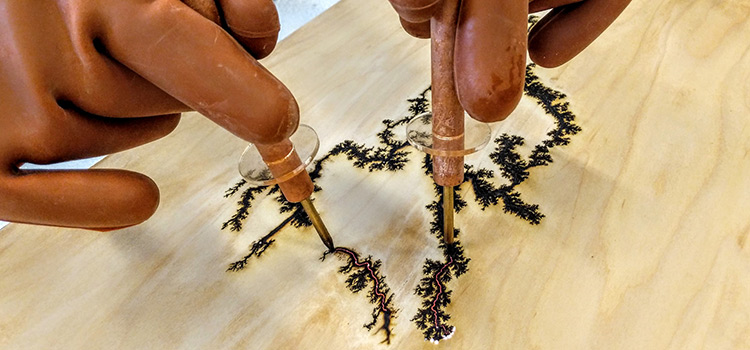
The abstract artworks done on the wood are done by using a device with high-voltage electricity. However, devices found for this type of work are typically expensive. For this reason, many prefer to make their own makeshift woodburning devices.
How to Makeshift Burn Wood into a Wood Buring Device?
To burn wood with a battery charger, you will need to convert it into a makeshift woodburning device at first. However, battery chargers are only capable of delivering up to 12 volts which is nearly not enough to burn wood.
Numerically, to burn wood, you will require at least 2000 volts. Therefore, a transformer is needed to convert the output voltage to the desired voltage. However, this also makes the project very dangerous due to the high amount of resultant current.
Hence, you need to proceed with maximum caution if you decide to convert a battery charger into a woodburning device. One way is to order one to be built for you. Another is to build one yourself. You will have to follow along to see how.
Step 1: Gather the Materials
To get on with this project of making your woodburning device, get yourself a battery charger and a variable switch. This switch will adjust the output the charger will deliver.
You will also have to procure some other materials aside from these two devices. They include wire cutters, soldering iron, shrinking tube, pliers, electrical tapes, copper rods, short screws, heavy-duty wires, etc.
Step 2: Disassemble the Battery Charger
Firstly, you have to disassemble the battery charger to expose its internal components. Do it by using the right screwdrivers to unscrew the screws. Then remove the circuit boards and other elements that are not needed.
Step 3: Connect the Dimmer Switch
Next, you have to locate the input port of the charger. Once you have removed the circuit board where the input wire was connected, you will have to connect the dimmer switch with the input wire.
Use a shrinking tube to enclose the connection so that there is no risk of shorting. Connecting the dimmer switch to the battery charger’s input port will allow you to increase the voltage output of the charger.
Step 4: Connect the Copper Rods to the Battery Clamps
The next step is to ensure that the device has the points for the woodburning process. Locate the battery clamps and remove the circuit boards related to the wires. Now, use an additional wire and connect the clamps with the wire that has passed through the dimmer switch.
Step 5: Check the Connections and Reassemble the Charger
At the final step, check the connection and make sure that they are secured by making use of electrical tape or a shrinking tube. Then reassemble the charger by putting the screws back to their places using screwdrivers.
That is how you will be doing your very own makeshift woodburning device using a battery charger. Now, plug it into an outlet and turn the dimmer switch counterclockwise completely. That way, there will be no current on the output rods and you can commence your Lichtenberg design.
Conclusion
As the process of burning wood is natural, you will only need to focus on the replication of the design. Anyone can be tempted to try out burning the wood and it is pretty fun. However, the project involves direct and alternating current along with electrical wiring. Therefore, only people with basic knowledge of electrical wiring should handle it.
Subscribe to our newsletter
& plug into
the world of circuits