How to Solder Ribbon Cable | Mastering the Art of Soldering
Whether you’re connecting ribbon cables to circuit boards, repairing damaged cables, or customizing cable lengths, skillful soldering ensures secure and reliable connections. And to complete it flawlessly, there are other processes involved. This includes cleaning and checking the solder joints in addition to prepping and soldering the ribbon cable.
This article will guide you through the process of soldering ribbon cables effectively, ensuring strong and durable connections.
How to Solder Ribbon Cables
Ribbon cables, also known as flat cables, consist of multiple parallel conductors enclosed in a flat plastic or PVC jacket. These cables are commonly found in applications that require compact and high-density connections, such as computers, printers, and electronic devices. Soldering ribbon cables enables the individual conductors to be securely attached to connectors or circuit boards.
What You’ll Need
The following are the components we need to solder ribbon cables.
- Ribbon cable
- Soldering iron
- Solder
- Soldering wick or desoldering braid (optional)
- Flux (optional)
- Isopropyl alcohol
- Cotton swabs
- Fine-tipped tweezers
Preparing the Ribbon Cable
Cut the ribbon cable to the desired length. Make sure to leave enough slack so that you can easily manipulate the cable during soldering. Strip the end of the ribbon cable. Use a sharp utility knife or razor blade to carefully score the insulation along the length of the cable.
Then, gently peel off the insulation to expose the copper wires. Clean the exposed copper wires. Use isopropyl alcohol and cotton swabs to clean the copper wires and remove any dirt or debris. This will ensure a good solder joint.
Soldering the Ribbon Cable
Following is the step-by-step process about how to solder ribbon cables properly.

- Tin the soldering iron tip. Apply a small amount of solder to the tip of the soldering iron. This will help the solder flow smoothly when you’re soldering the wires.
- Apply flux to the pads on the circuit board (optional). Flux is a cleaning agent that helps the solder flow onto the pads and make a strong connection.
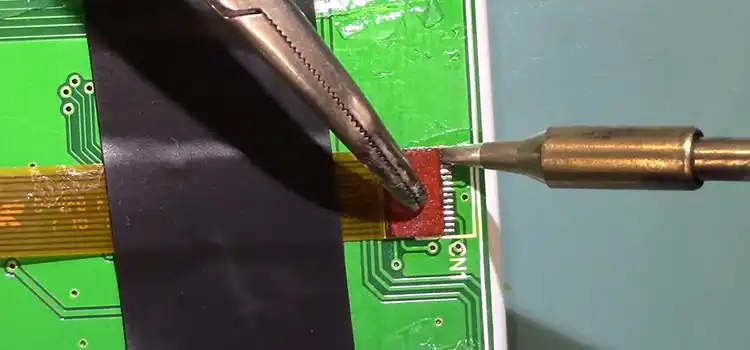
- Position the ribbon cable on the circuit board. Align the exposed copper wires with the appropriate pads on the circuit board. Make sure the cable is flush against the board and the wires are making contact with the pads.
- Solder each wire to the corresponding pad. Touch the tip of the soldering iron to the wire and pad simultaneously until the solder melts and flows around the wire. Hold the wire in place until the solder cools and solidifies.
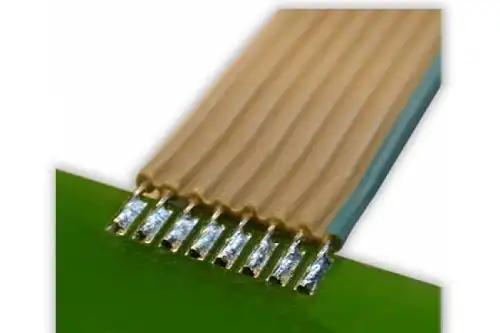
- Inspect the solder joints. Once all of the wires are soldered, inspect the solder joints to make sure they are clean and have a good connection. If there are any blobs of solder or bridges between the wires, use a soldering wick or desoldering braid to remove the excess solder.
- Clean up the excess flux (optional). If you used flux, use isopropyl alcohol and cotton swabs to clean up any excess flux from the circuit board.
Additional Tips
Use a fine-tipped soldering iron to make precise solder joints. Apply a small amount of solder to the tip of the soldering iron. Too much solder can make the joint messy and difficult to clean up. Hold the wire steady while you’re soldering.
This will help to prevent the joint from being misaligned. Don’t overheat the solder joint. Overheating can damage the wires or the circuit board. Clean up any excess flux after soldering. Flux can be corrosive and can damage the circuit board over time.
Frequently Asked Questions
Can I solder ribbon cables without using heat shrink tubing?
While heat shrink tubing provides insulation and added protection to soldered joints, it is possible to solder ribbon cables without using them. However, using heat shrink tubing is recommended to ensure long-term reliability and prevent potential short circuits.
What if I accidentally damage the internal wires while soldering ribbon cables?
Accidentally damaging the internal wires can compromise the integrity of the ribbon cable. If this happens, it is advisable to cut a new section of the cable and start the soldering process again. Taking care to avoid damaging the wires during the soldering process is crucial for a successful connection.
Can I use a regular soldering iron for soldering ribbon cables?
Yes, a regular soldering iron with a fine tip can be used for soldering ribbon cables. However, it is essential to ensure that the soldering iron is at the correct temperature and the tip is clean to achieve proper solder flow and avoid damaging the cables. Using a soldering iron with adjustable temperature settings is recommended for precise control.
To Conclude
Soldering ribbon cables requires precision and attention to detail, but with practice, it becomes a valuable skill for electronic device users. By following the steps and using the right tools, you can confidently solder ribbon cables, creating secure connections and ensuring seamless connectivity in electronic projects.
Subscribe to our newsletter
& plug into
the world of circuits