How to Wire Multiple 240V Outlets | Step-by-Step Guide
In today’s modern homes and workshops, the rise in high-powered appliances and tools has created a growing demand for 240V outlets. These outlets aren’t just the usual plug points; they’re designed to fuel devices that need a bit more kick than the standard ones can provide.
However, setting up these outlets isn’t as simple as one might think. It’s a task that requires meticulous planning and attention to detail.
This article is here to guide you through the process. We’ll walk you step-by-step, ensuring that you can power your devices efficiently while always prioritizing safety.
Understanding 240V Outlets
Before diving deep, let’s first grasp the essence of a 240V outlet. Think of it as the more robust sibling to the common outlets scattered around our homes. Most of our daily gadgets—phones, lamps, and computers—thrive on these standard outlets.
However, some heavy-duty devices, like large appliances or specific workshop tools, crave a bit more power to function effectively. This is where the 240V outlets come into play.
Safety First
1. Prioritize Safety:
- Turn off the main power switch before working on electrical installations.
- Use appropriate tools with insulated handles.
- Wear protective gear like rubber gloves and safety goggles.
- Keep a fire extinguisher within reach for added safety.
2. Licensed Electrician’s Expertise:
- Electrical work demands expertise and precision.
- A licensed electrician possesses the necessary knowledge and experience.
- They are well-versed in local codes and regulations.
- Hiring a professional ensures safety and peace of mind for your project.
Choosing the Right Circuit Breaker
How to Calculate the Required Amperage
1. Calculate Power Needs: Determine the power requirement (P) of each device or appliance, typically labeled in watts (W).
2. Add Up Power Needs: Sum the power needs of all devices: ΣP_device.
3. Calculate Required Amperage (I): Use the formula: I = P_total / V, where V is the voltage (usually 240V for 240V outlets).
4. Choose the Right Circuit Breaker: Select a circuit breaker with a rating equal to or greater than the calculated required amperage (I) for safe electrical operation.
Best Practices for Selecting the Appropriate Circuit Breaker
It’s not just about the numbers. Choose a circuit breaker with a slightly higher capacity than your calculated total to avoid overload. This buffer ensures safety and longevity. When in doubt, always consult an expert to make an informed decision.
Wiring Multiple 240V Outlet Step-by-Step
To install a 240V outlet, here’s the step-by-step guidance you should be aware of.
Step 1: Assessing Power Requirements
Calculating Device Power Needs:
- Start by understanding the power needs of each device you plan to connect.
- Devices typically have their power consumption specified in watts on a label or in the user manual.
- Sum up the wattage for all devices to find the total power required for your circuit.
Preventing Overloading:
- Overloading happens when the total power demand of your devices exceeds what the circuit can safely handle.
- This can lead to performance issues like flickering lights or tripped circuit breakers.
- More importantly, it can create safety hazards.
- Ensure that the total power demand of your connected devices doesn’t overwhelm the circuit for safe and efficient electrical operation.
Step 2: Selecting the Wiring Method
In the second step, you’ll decide how to connect your multiple 240V outlets. There are two common ways to do this: daisy-chaining and branching.
1. Daisy-Chaining: This is like connecting outlets in a chain, one after the other. It’s simple and works well for outlets placed in a row, but keep in mind that if one outlet has a problem, it can affect the others in the chain.
2. Branching: Branching means each outlet connects directly to the main power source. This method offers more independence to each outlet and is a good choice when outlets are spread across different locations.
Consider your space and the layout of your outlets to pick the method that suits you best for a reliable and safe electrical setup.
Step 3: Collect essential tools and materials for the installation
- Screwdrivers of various sizes for different tasks.
- Wire strippers to prepare and strip wire ends.
- A voltage tester to check electrical presence and safety.
- Electrical tape for insulation and securing connections.
- Wire nuts for secure wire connections.
- Outlet boxes, which serve as the housing for the 240V outlets
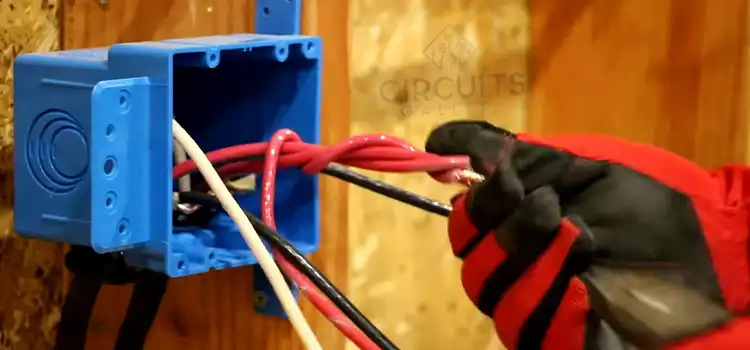
Step 4: Preparing the Outlet Boxes
In this step, you’ll get your outlet boxes ready. Install them in the locations you’ve chosen, ensuring they are securely positioned on the wall. Make sure the boxes can comfortably house the outlets and the wiring that will connect them. Properly preparing the outlet boxes sets the foundation for a safe and organized electrical installation.
Step 5: Wiring Multiple Outlets
1. Connecting to the Power Source:
– Link the wiring from the main power source to the outlets.
– Follow the manufacturer’s guidelines for the correct and safe connection.
2. Routing the Wires:
– Ensure that the wires are routed neatly without tangles.
– Avoid creating tripping hazards or obstructions in the pathway.
3. Securing the Wiring:
– Secure the wiring in a manner that prevents it from coming loose.
– Ensure that the wiring doesn’t block access to the outlets or create safety issues.
4. Efficient Wiring:
– Proper wiring guarantees that your outlets receive power safely and function efficiently.
– This step sets the stage for your outlets to reliably serve your electrical needs.
Step 6: Testing and Safety Checks
1. Checking Outlet Functionality:
– Turn on the power and use a voltage tester to verify if each outlet is working correctly.
– The voltage tester should display the expected result to ensure the outlets are functioning as intended.
2. Ensuring Proper Grounding:
– Confirm that the grounding, which is a safety feature, is correctly connected.
– A proper grounding system prevents electrical hazards, contributing to overall safety.
3. Consulting a Professional:
– If there are uncertainties or concerns about the testing and safety checks, it’s advisable to seek the guidance of a qualified electrician.
– Professional expertise can provide peace of mind and enhance safety assurance.
Step 7: Troubleshooting and Tips
1. Addressing Common Issues
– Deal with common problems like loose connections or wiring issues.
– Troubleshoot to ensure your outlets function correctly.
2. Additional Tips for Success
– Apply best practices for a safer and more reliable installation.
3. Professional Consultation
– Seek an electrician’s expertise for complex issues or uncertainties.
– Professional assistance ensures safety and effectiveness.
Ground faults can pose risks if left unchecked. To ensure safety, use a ground fault circuit interrupter (GFCI) tester. This tool helps confirm that your outlet’s safety features are functioning correctly. If the tester detects any issues, it’s time to address them immediately.
Frequently Asked Questions
1. What is a 240V outlet used for?
240V outlets are typically used for high-powered devices and appliances such as electric stoves, dryers, and certain workshop tools.
2. Is there a difference between daisy-chaining and branching circuits?
Yes, daisy-chaining connects outlets in a series, one after another. Branching connects each outlet directly to the main power source.
3. Are there any signs to watch out for that might indicate my 240V outlet is malfunctioning?
Flickering lights, unusual sounds, burning smells, or discoloration around the outlet are signs that require immediate attention.
Conclusion
Setting up and maintaining 240V outlets can seem complex, but with the right steps and regular checks, it’s manageable. Prioritizing safety and seeking expert advice when needed ensures a reliable and secure power source for all your high-powered devices. Stay informed and stay safe!
Subscribe to our newsletter
& plug into
the world of circuits