Lutron CL Dimmer Wiring Diagram
Lutron CL Dimmers can be wired in a variety of ways, depending on the type of application.
For a single-pole application, you will need to connect the black wire from the dimmer to the black hot wire in the wall box, the red wire from the dimmer to the red load wire in the wall box, and the ground wire from the dimmer to the green ground wire in the wall box.
A Lutron CL Dimmer is a type of dimmer switch that is designed to work with a wide range of dimmable light bulbs, including incandescent, halogen, CFL, and LED bulbs. CL Dimmers are known for their reliability and their ability to provide smooth, flicker-free dimming.
How Do You Wire Lutron CL Dimmer
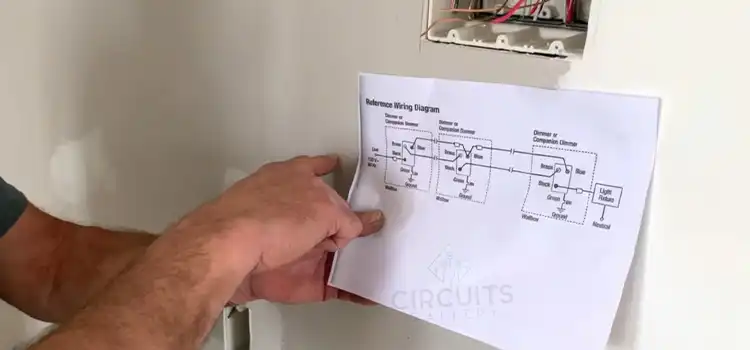
The following wiring diagram and instructions show how to install a Lutron CL Dimmer in a single-pole application:
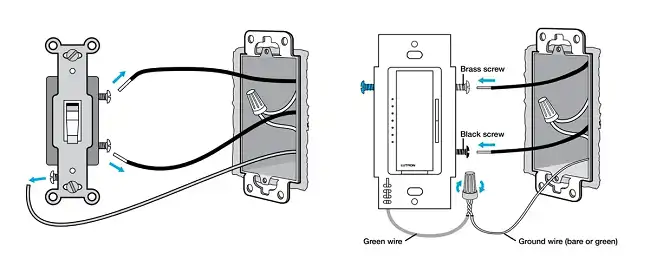
Figure 1: Lutron CL dimmer wiring diagram
- At the breaker box, turn off the electricity to the circuit.
- Take the old switch out of the wall box.
- Connect the dimmer’s ground wire to the green ground wire in the wall box.
- Connect the dimmer’s black wire to the wall box’s black hot wire.
- Connect the dimmer’s red wire to the red load wire in the wall box.
- Use the provided screws to secure the dimmer in the wall box.
- Reconnect the power at the breaker box.
Three-Way Wiring
Three-way wiring is used when two switches control the same light fixture. This is often used in stairwells and hallways. The following wiring diagram shows how to install two Lutron CL Dimmers in a three-way application:
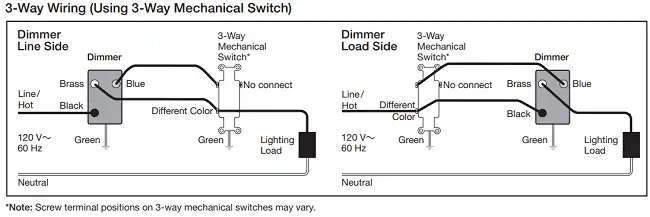
Figure 2: Three-Way Wiring
The instructions are quite the same as the single-pole application.
Four-Way Wiring
Four-way wiring is used when there are three or more switches that control the same light fixture. This is often used in large rooms with multiple entrances. The following wiring diagram shows the four-way application of the Lutron CL dimmer:
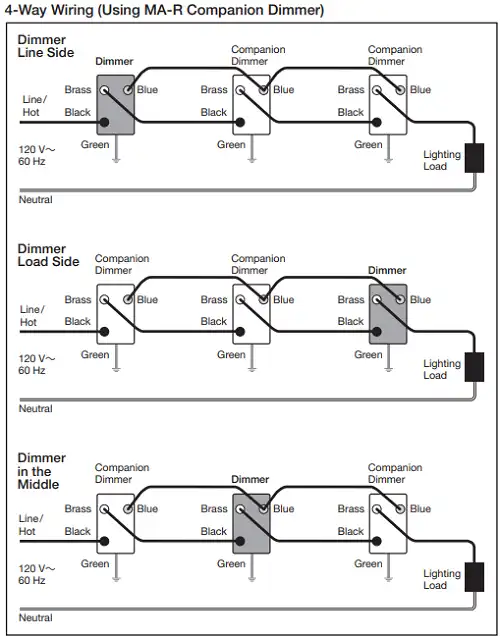
Figure 3; Four-Way Wiring
Wiring Multiple Dimmers
Multiple Lutron CL Dimmers can be wired together to control multiple light fixtures. This is often used to create a lighting scene, such as all of the lights in a room dimming together.
Wiring with Lutron Caséta Wireless System
To wire a Lutron CL Dimmer with the Lutron Caséta Wireless System, you will need a Lutron Smart Bridge. The Smart Bridge is the central hub of the Caséta Wireless System and it allows you to control your Lutron devices from anywhere in your home using the Lutron app on your smartphone or tablet.
Wiring with Lutron RadioRA 2 System
To wire a Lutron CL Dimmer with the Lutron RadioRA 2 System, you will need a Lutron RadioRA 2 Main Repeater. The Main Repeater is the central hub of the RadioRA 2 System.
Wiring with Lutron HomeWorks QS System
The Lutron HomeWorks QS System is the most powerful home automation system from Lutron. It allows you to control your lights, shades, other devices, and even your HVAC system. Lutron CL Dimmers can be wired to work with the HomeWorks QS System.
Troubleshooting Wiring Problems
If you are having problems with your Lutron CL Dimmer, there are a few things you can check:
- Make sure that all of the wires are properly connected.
- Make sure that the dimmer is compatible with the type of light bulbs you are using.
- Try resetting the dimmer.
- If you are still having problems, consult a qualified electrician.
Safety Precautions
Here are some safety precautions to take when wiring a Lutron CL dimmer:
- Always turn off the power to the circuit at the breaker box before working on any electrical wiring.
- Use insulated tools and wire strippers to prevent electrical shock.
- Make sure that all of the wires are properly connected and that the wire nuts are tight.
- Do not overload the dimmer. Make sure that the total wattage of the light bulbs connected to the dimmer does not exceed the dimmer’s maximum wattage rating.
- Do not install the dimmer in a damp location.
- If you are not comfortable wiring your dimmer, please consult a qualified electrician.
Local and National Electrical Codes
Here are some general local and electrical codes that apply to Lutron CL dimmers:
- The dimmer must be installed in a junction box that is approved for the type of dimmer and the type of cable being used.
- The dimmer must be installed in a location that is protected from moisture and excessive heat.
- The dimmer must be wired by the NEC or CEC.
- The dimmer must be grounded.
- The dimmer must be used with a compatible load.
If you are not comfortable wiring your dimmer, please consult a qualified electrician.
How Do I Find the Correct Lutron CL Dimmer Wiring Diagram for My Specific Dimmer Model?
Here are some tips for finding the correct Lutron CL Dimmer wiring diagram:
- Make sure that you know the exact model number of your dimmer. You can find the model number on the dimmer itself or the packaging.
- If you are unable to find the wiring diagram on the Lutron website, you can try searching for it online. Many websites offer wiring diagrams for Lutron dimmers.
- If you are still having trouble finding the correct wiring diagram, you can contact Lutron customer support for assistance.
Do I Need a Neutral Wire for Lutron CL Dimmer Installation?
Whether or not you need a neutral wire for Lutron CL dimmer installation depends on the specific model of dimmer you are installing. Some Lutron CL dimmers require a neutral wire, while others do not.
To determine if your Lutron CL dimmer requires a neutral wire, you can consult the installation instructions that came with your dimmer. You can also check the Lutron website for information on your specific dimmer model.
Frequently Asked Questions
Can I Install a Lutron CL Dimmer in a Multi-Location Switch Setup?
Yes, you can install a Lutron CL Dimmer in a multi-location switch setup. To do this, you will need to use companion dimmers. Companion dimmers are identical to regular CL dimmers, but they have an additional traveler terminal.
What Are the Typical Wire Color Codes for a Lutron CL Dimmer?
The typical wire color codes for a Lutron CL Dimmer are as follows:
- Black: Hotwire
- Red: Load wire
- Green: Ground wire
- White: Neutral wire (optional)
Are There Any Special Considerations When Wiring a Lutron CL Dimmer for LED or CFL Lights?
Yes, there are a few special considerations when wiring a Lutron CL Dimmer for LED or CFL lights:
- Make sure that the dimmer is compatible with the type of LED or CFL lights you are using. Some Lutron CL dimmers are not compatible with all types of LED and CFL lights.
- Do not overload the dimmer. Make sure that the total wattage of the LED or CFL lights connected to the dimmer does not exceed the dimmer’s maximum wattage rating.
- Use a dimmer that is designed for LED or CFL lights. Lutron makes several CL dimmers that are specifically designed for LED and CFL lights. These dimmers provide better dimming performance and compatibility with LED and CFL lights.
What Should I Do if My Lutron CL Dimmer Is Not Working as Expected After Installation?
There are a few things you can do if your Lutron CL dimmer is not working as expected after installation:
- Check the wiring. Make sure that all of the wires are properly connected to the dimmer and that the wire nuts are tight.
- Check the dimmer settings. Make sure that the dimmer is set to the correct mode for the type of light bulb you are using. You can adjust the dimmer settings using the buttons on the dimmer or using the Lutron app.
- Reset the dimmer. If the dimmer is still not working properly, you can try resetting it. To reset the dimmer, press and hold the “Off” button for 10 seconds.
- Contact Lutron customer support. If you have tried all of the above and the dimmer is still not working properly, you can contact Lutron customer support for assistance.
Is It Safe to Install a Lutron CL Dimmer Myself, or Should I Hire a Professional Electrician for the Installation?
Whether or not it is safe to install a Lutron CL dimmer yourself depends on your level of experience and comfort with electrical work. If you are not familiar with electrical wiring, it is always best to hire a professional electrician to install the dimmer for you.
However, if you are comfortable with electrical work and have the necessary tools and materials, you can safely install a Lutron CL dimmer yourself. Just be sure to follow the installation instructions carefully and to take all necessary safety precautions.
Final Thoughts
The type of dimmer switch and its minimum/maximum load range will determine whether or not it is compatible with LED light bulbs. LED light bulbs perform best with trailing edge dimmers, while standard incandescent and halogen light bulbs work best with leading edge dimmers.
Subscribe to our newsletter
& plug into
the world of circuits