Philips T8 Led Wiring Diagram| Complete Wiring Guide for Philips T8 LED Tubes
Properly wiring Philips T8 LED tubes is essential for optimal performance and safety. Unlike traditional fluorescent lighting, Philips T8 LED tubes like Direct Wire LED and InstantFit LED have specific wiring requirements that must be addressed.
Selecting the correct wiring diagram is crucial to ensure efficient, reliable operation. This guide will provide a detailed look at Philips T8 LED wiring diagrams, connections, installation steps, and troubleshooting.

Overview of Philips T8 LED Wiring
Philips offers Direct Wire LED tubes that connect directly to line voltage, and InstantFit tubes compatible with existing ballasts.
Direct Wire tubes require the ballast to be bypassed or removed completely. The line voltage wires connect directly to the tombstones at both ends of the LED tube.
InstantFit tubes can operate with a compatible fluorescent ballast still in place. The tombstones at each tube end are inserted into the ballast sockets.
Correct wiring depends on the tube type and your existing electrical setup.
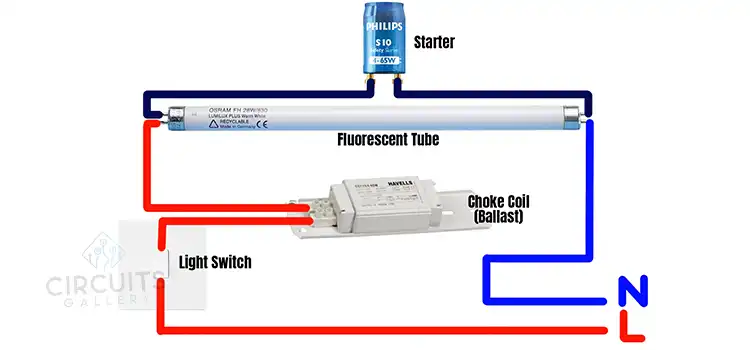
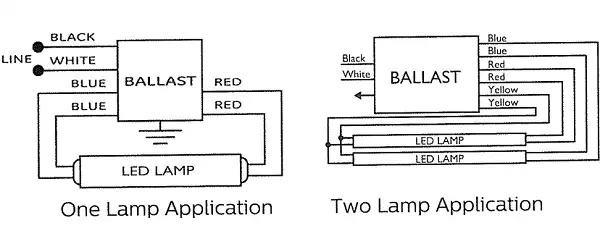
Wiring Diagram of Philips T8 LED
These wiring diagrams are intended to show the most general wiring method:

Terminal Identification of Philips T8 LED
Understanding the terminal connections is key for proper wiring.
Tombstones: Contacts at ends of LED tubes that insert into sockets to deliver power through the tube.
Blue wires: Usually connect to one end of the LED tube. They complete the circuit between the tombstone connectors and the LED tube.
Red wires: Also connect to the LED tube but on the opposite end of the blue wire. Red completes the circuit on the other side.
Yellow wires: Often used as a bridge wire in multi-lamp fixtures. The yellow wire jumps between the tombstone connections to connect all the lamps in parallel or series.
Line Voltage Wires: Typically black (live) and white (neutral) wires that deliver power from the source.
Ballast: Provides regulated power output to the fluorescent fixture. May be bypassed or removed completely.
Capacitors: Extra components are sometimes required for LED drivers to operate properly depending on the tube type.
Ground Wire: Protects against electric shock by providing a safe path to the ground. Usually green or bare.
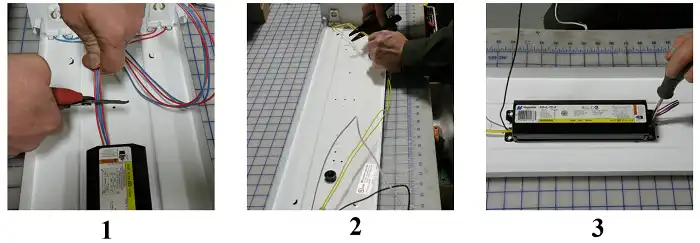
Step-by-Step Wiring Procedure of Philips T8 LED Tubes
Follow these steps to wire Philips Direct Wire T8 LEDs:
- Disconnect power to the luminaire and cut the load and neutral wires from the ballast leaving a sufficient amount of wire necessary
- Remove the additional wire from the opposite side of the ballast as the LED tube requires power only at one end.
- Remove the ballast for the Direct wire LED or Leave it for the IstantFit LED.

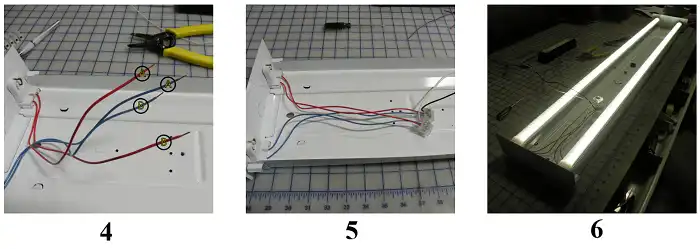
- Strip the load and neutral wires from the first set of wires cut, then connect one load wire from one side to one neutral wire from the other.
- Use Push-in connectors to connect the grouped wire.
- Connect the wires to the power source.
- Restore power – the LED tube should now illuminate.

Perform a visual inspection to ensure lamp holders are not damaged or loose.
Which Wiring You Can Do for Philips T8 LED? : Series or Parallel Wiring
Philips T8 LED tubes can be wired in either a series or parallel configuration:
Series – Tubes are daisy-chained end-to-end. Line voltage applied to the first tube passes through the entire series.
Parallel – Line voltage is applied independently to each tube. Tubes are separately wired to a power source.
Series wiring allows multiple LED tubes to be powered from a single ballast or driver. Parallel provides independent operation of each tube.
Testing After Wiring
After installing Philips T8 LED tubes:
- Verify proper illumination and no visible issues.
- Check tombstone connections are securely fitted.
- Confirm no abnormal buzzing or noise from the fixture.
- Measure the current draw to ensure it matches tube specifications.
- Check for any signs of flicker or intermittent power.
Thorough testing helps identify and resolve any wiring problems.
Troubleshooting Common Wiring Issues
Common wiring issues you can face after wiring Philips T8 LED tubes:
- No light: Check wiring connections and voltage at tombstones. Verify Compatible tombstones and ballast.
- Flickering light: – Loose wiring connection. Inspect wires and tombstone contacts.
- Buzzing/humming: Usually a problem with the tombstone contacts or sockets.
- Burned-out LEDs: Indicative of wiring issue causing voltage spikes. Check connections.
- Overheating: Inadequate wire gauge for LED tube current draw. Replace with thicker wires.
Always consult a professional electrician for suspected wiring problems.
Frequently Asked Questions (FAQs)
1. Can I Use a Single Ballast to Power Multiple Philips LED tubes?
Answer: Yes, with series wiring you can connect multiple tubes to a single ballast or driver. Ensure compatibility.
2. What’s the Benefit of Bypassing or Removing the Ballast for Led Tubes?
Answer: Bypassing the ballast increases efficiency and light output while removing it eliminates a point of failure.
3. Is It Safe to Use Existing Tombstone Sockets When Installing Led Tubes?
Answer: Verify the sockets are in good condition with no damage or corrosion before using them with new LED tubes.
To Conclude
Understanding the Philips T8 LED wiring diagram specifications and properly installing the tubes ensures you maximize efficiency and light quality. Take the required safety precautions, follow the step-by-step process, and properly wire the tombstones. With the help of this guide, you can unlock the full potential of your T8 LED lighting.
- Overview of Philips T8 LED Wiring
- Wiring Diagram of Philips T8 LED
- Terminal Identification of Philips T8 LED
- Step-by-Step Wiring Procedure of Philips T8 LED Tubes
- Which Wiring You Can Do for Philips T8 LED? : Series or Parallel Wiring
- Testing After Wiring
- Troubleshooting Common Wiring Issues
- Frequently Asked Questions (FAQs)
- To Conclude
Subscribe to our newsletter
& plug into
the world of circuits