Swann Camera Wiring Diagram | 2 Methods Explained
Power wire, video cable, and audio cable are the wires that need proper wiring during the Swann camera installation.
Swann cameras can be powered using either a separate power cord or a single Power Over Ethernet (PoE) cable. PoE-enabled systems require only one cable to deliver both power and an internet connection. Now let’s get to know more about the wiring of Swann cameras.
Wiring Diagram and How to Wire Swann Camera
Swann cameras can be wired using two powering ways. For proper wiring, you need to know the function of the specific pins and wires of a Swann camera:
| Pin | Color | Function |
| 1 | Red | Power |
| 2 | Black | Ground |
| 3 | White | Video |
| 4 | Yellow | Audio (optional) |
The steps to follow while wiring a Swann camera are given below:
Method 1: Wiring with Separate Power Cord
The positive power wire is the red wire, while the negative power wire is the black wire. These wires must be linked to the power supply’s corresponding terminals. The steps that you must follow to wire your Swann camera with a separate power cord are illustrated below:
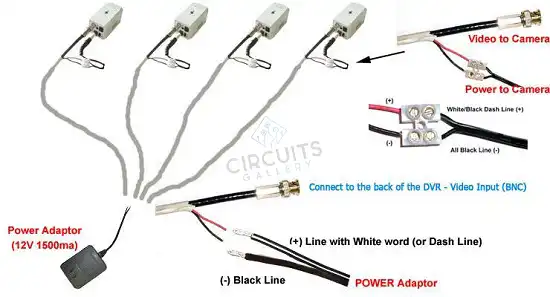
Figure 1: Wiring with Separate Power cord
- Connect the camera’s red wire to the power supply’s positive terminal.
- Connect the camera’s black wire to the power supply’s negative connector.
- Connect the video wire from the camera to the DVR or NVR’s video input port.
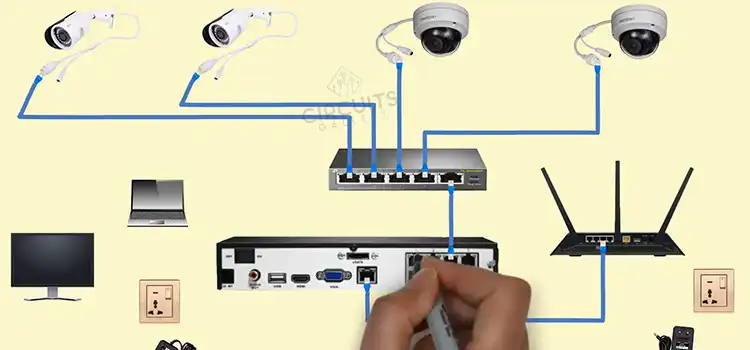
Method 2: Wiring with PoE Cable
Check that the PoE switch or injector is rated for the camera’s voltage and current requirements. If you’re using a PoE switch, ensure sure the port to which you’re attaching the camera is PoE enabled. The steps that you must follow to wire the Swann camera with PoE cable are illustrated below:
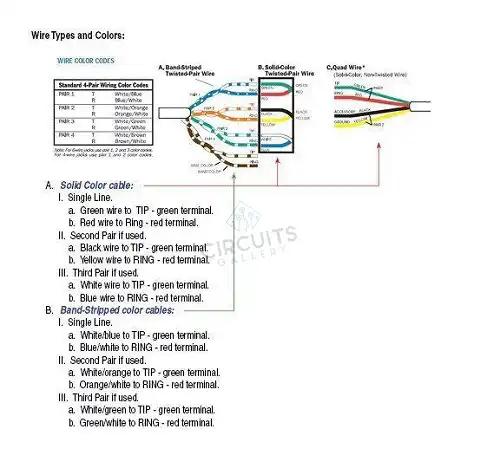
Figure 2: Wiring with PoE Cable
- Connect the camera’s PoE cable to the PoE switch or injector.
- Connect the PoE switch or injector’s Ethernet cable to the DVR or NVR.
- Connect the PoE switch or injector (if necessary) to the power adapter.
- Turn on the PoE switch or injector, as well as the DVR or NVR.
- The camera should turn on and connect to the DVR or NVR automatically.
Safety Measurements That You Need to Take While Wiring a Swann Camera
The Factors That You Must Notice While Wiring a Swann Camera Are Given Below:
- Prior to the final installation, test your security equipment. Do not test your security equipment until you have placed it in its designated location.
- Install cameras 8-10 feet above the ground.
- Make use of the corners. The corner of your living room, kitchen, or garage is an excellent location for indoor security cameras.
- Keep an eye out for windows and other direct light sources. Cameras should not be pointed straight towards windows because this can cause reflection issues.
- Install cameras using only conventional hardware and tools. Using inferior tools may cause damage to your security camera and other components, voiding the warranty.
- Determine whether the cameras should be concealed or visible. While visible security cameras help homeowners prevent burglary and vandalism, they are also easy targets for thieves and vandals.
- Keep outside cameras safe against inclement weather. Although outdoor security cameras are frequently designed to be weatherproof and waterproof, you need still to take precautions to keep them safe from the elements.
Frequently Asked Questions and Answers – FAQs
What Types of Power Sources Can I Use for Swann Cameras?
cameras are normally powered by a 12V DC power supply, whereas PTZ cameras are powered by a 24V AC power supply. Some security cameras need 220V AC power, but most indoor security cameras use a 5V DC power supply.
How Do I Extend the Wiring for My Swann Camera?
It occurs all the time: you get your camera system and start wiring cords from your DVR out to where you want the camera to mount. You’re about 20 feet away from connecting the camera when you realize your wire is too short.
Using a BNC-S splice connector or an extension cable, you can join two CCTV camera cables together to provide that extra length to your route.
Conclusion
Swann cameras are either 12V DC or dual voltage, which means they can operate on either voltage. Please keep in mind that connecting a 12v security camera to a 24v power supply will almost always result in the camera’s circuit board being burned and rendered useless.
Subscribe to our newsletter
& plug into
the world of circuits